To prime fish toilet pre-filter units properly, you must fill the chamber and return line with water before powering the canister on. Skip that step and the pump runs dry: flow stutters, the cabinet starts gurgling, and a dry-running impeller can overheat within minutes. The whole job takes about two minutes — unscrew the two top caps, pour water into Pipe No.1 until it overflows from Pipe No.2, bleed any trapped air from the intake hose, then start the pump. The 30-second video below shows the exact sequence, filmed on a running 120-gallon tank.
| Priming Parameter | Specification / Action |
|---|---|
| Total Time Required | Under 2 minutes (installation day only) |
| Canister Power State | Switched OFF and unplugged during filling |
| Water Fill Port | Pipe No.1 (pour slowly until chamber fills) |
| Air Bleed / Overflow Signal | Pipe No.2 (screw cap on once water overflows) |
| Re-Priming After 3s Flush? | Not required (chamber stays full during bottom drain) |
What priming actually does
A fish toilet pre-filter chamber is a separate volume of water sitting above your canister. When you install it dry, that volume is filled with air, and the pump has to pull that air down through the intake tube before it can move any water. Most canisters can clear a small bubble on their own, but a full chamber of air causes a severe airlock — the pump keeps spinning against nothing, which is why the unit gurgles and flow never settles.
When you prime fish toilet pre-filter chambers in advance, you remove that air pocket completely. Water in the chamber gives the pump something to pull immediately, so it starts at full flow instead of straining. On units with a bottom drain valve, you also get a second benefit: any air left in the line escapes through Pipe No.2 while you fill, instead of travelling down to the impeller.
How to prime fish toilet pre-filter units: 6 steps
Step 1 — Unscrew the two caps
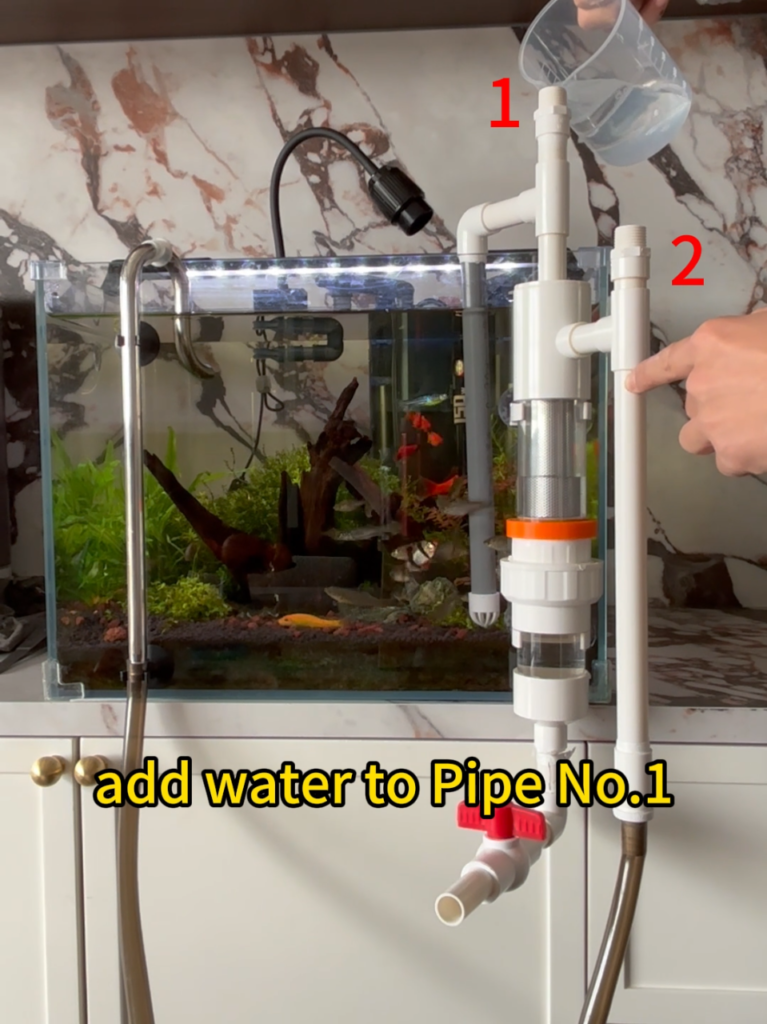
The unit has two vertical ports on top, labelled Pipe No.1 and Pipe No.2. Unscrew the cap from each one. Work with the canister switched off and unplugged — priming is a gravity job, and a running pump will fight you the whole way.
Step 2 — Pour water into Pipe No.1
Use a measuring cup or a jug and pour slowly into Pipe No.1. You will hear the chamber filling and see the water level rise in the clear body. Pour steadily rather than dumping it in: fast pouring pushes air pockets deeper into the mesh instead of letting them rise.
Step 3 — Screw Pipe No.2 back on and keep filling Pipe No.1
Once the chamber holds water, screw the cap back onto Pipe No.2 — but keep pouring into Pipe No.1. This is the step people skip, and it is the reason a setup “won’t prime”: with both ports open, water simply runs back out instead of displacing the air in the return line.
Step 4 — Keep filling until water overflows from Pipe No.2
Keep adding water to Pipe No.1 until water rises and overflows from Pipe No.2. That overflow is your confirmation signal: it means the chamber, the internal mesh section, and the return path are all water-filled, with no air pocket left to feed the pump.
Step 5 — Check the inlet hose for trapped air and purge it
Before powering on, run your eyes along the intake hose from the tank down to the unit. If you can see an air gap or a bubble sitting in a high point, lift or tilt that section of hose so the bubble travels up and clears. A bubble trapped at a bend will reach the impeller eventually — better to release it now than listen to it rattle for the next ten minutes.
Step 6 — Start the canister and confirm steady flow
Plug the canister back in and switch it on. You should hear normal water movement within a few seconds, and see the chamber fill completely with no air band at the top. Let it run for a minute and check both hose connections for weeping. Flow should be at the same rate you had before you added the pre-filter — if it is visibly weaker, switch off and repeat Step 5.
Do you have to prime it again after every flush?
No. The 3-second flush only drains sludge through the bottom drain valve while the chamber stays full of water, so the system never loses its prime. You need to prime again only after a full teardown — removing the unit for cleaning, a hose change, or if the chamber has been drained completely dry.
Troubleshooting: 3 fixes when you prime fish toilet pre-filter setups
The chamber will not fill at all
An airlock in the return line. Pour more slowly into Pipe No.1 and tap the side of the chamber gently — the air has to leave through Pipe No.2, and a fast pour can close that path with water.
Water overflows the moment you start pouring
Either the cap on Pipe No.2 is still loose, or the bottom drain valve is open. Close the red drain valve first, then re-seat both caps and start again.
The canister gurgles after priming
Air is still in the intake hose, usually at a high bend. Switch the pump off, lift the intake tube briefly out of the water so the air escapes, then restart. If the noise persists, repeat Step 5 with the hose straightened along its full run.
Which model does this guide apply to?
The sequence above applies to every edition of the A&Aqua Pro Magnetic Fish Toilet pre-filter — the 20mm standard unit for 16–20mm (5/8″–3/4″) hoses on 20–75 gallon tanks, the 25mm Monster Edition for 1″ plumbing on 75–200 gallon setups, and the Hidden Cabinet Inline version shown in the video. The only difference between them is hose diameter; priming works the same way on all three.
Frequently asked questions
A: Almost always an airlock in the return line. Pour water slowly into Pipe No.1 and tap the chamber wall so trapped air can escape through Pipe No.2. A fast pour seals that exit path with water and the chamber stops filling.
A: No. The flush drains sludge out of the bottom valve while the chamber remains full, so priming is only needed after a full teardown, a hose change, or if the unit has been drained completely.
A: Air is trapped in the intake hose, usually at a bend or a high point. Switch the pump off, lift the intake out of the water briefly so the bubble escapes, and restart. Repeating Step 5 with the hose straightened usually clears it for good.
A: Keep pouring into Pipe No.1 until water overflows from Pipe No.2. Stopping earlier leaves an air pocket that the pump has to push past, which is what causes stuttering flow on the first start.
A: No. Switch the canister off and unplug it first. A running pump creates suction in the line you are trying to fill and pulls the water straight through instead of letting it displace the air.
Stop priming by hand every time
Once you prime fish toilet pre-filter systems on installation day, it never comes up again — because the unit flushes in 3 seconds without being opened. Slide the external magnet along the orange ring to scrub the internal stainless mesh, open the red drain valve, and the sludge is gone. Choose your size below; both editions prime exactly the way this guide describes.
Stop priming by hand every time. Choose the right size for your tank:
20mm (5/8″–3/4″) Standard
Perfect for community tanks, tetras, and standard hoses. Ideal for 20–75 gal setups.
25mm (1″) Monster Edition
Built for massive bioloads, Plecos, and unrestricted flow on 1″ heavy-duty setups.